Attack Strategy: Hogs
Hogs are extremely powerful and versatile troops from TH 7-9. In order for the attack to be successful, it is recommended to use mass hogs their respective max levels per TH, which I suggest to upgrade them ASAP, as they are crucial in many different attacks.
Mass Hogs
.Mass hogs are most common against TH7 bases. They work very well against mid TH8 and low TH9 bases, but it's harder to 3 star maxed TH8-9 bases with mass hogs without a kill squad. Generally, mass hogs are best against extremely compact bases for two reasons. First, it eliminates the possibility of double giant bombs inside the base, that can easily wipe out a hog army. Second, it allows for greater coverage from heal spells, so you get better value from the them.
Besides double giant bombs, the biggest threats to mass hog attacks are the defending heros and cc troops. If it is easy to lure the cc troops, and the defending heros aren't a big threat to the base (either they can be lured to a side of the base and be picked off easily, or they are not next to many defenses), mass hogs are the way to go. Remember to kill cc before deploying mass hogs. These threats should be considered during base identification - whether mass hogs would be effective.
Before using mass hogs, the enemy cc troops must be killed. It's common to use 1-2 hogs to lure the cc troops, then surround it with archers/poison/AQ/BK to kill cc.
Note for TH9+: Beware of hogs that path to xbows. While xbows themselves are not grave threats, they have a fair number of hitpoints, which may stall hog progress.
Mass Hogs for TH7
Mass Hogs are a powerful strategy in war for TH7. Without the archer queen or poison, it is necessary to bring 20-30 archers (depending on how powerful enemy cc is) and surround the cc in the corner of a base. Bring 5 wizards to help clean up. Corner builder huts should always be sniped.
Fill the rest of the comp with hogs, and bring 3 heals. How to use these troops will be elaborated upon in further sections of this page.
Fill the rest of the comp with hogs, and bring 3 heals. How to use these troops will be elaborated upon in further sections of this page.
Hog Pathing (For all sorts of hog attacks, not just mass hogs)
Regardless of whether you're mass hogging or just using them as one element of your attack ,the key to a successful hog attack is pathing, pathing, and pathing. You need to know exactly where those hogs go. Generally, you don't want hogs branching off into many directions and continue to diverge, because it reduces the effectiveness of heal spells (due to not all hogs falling under the heal radius).
|
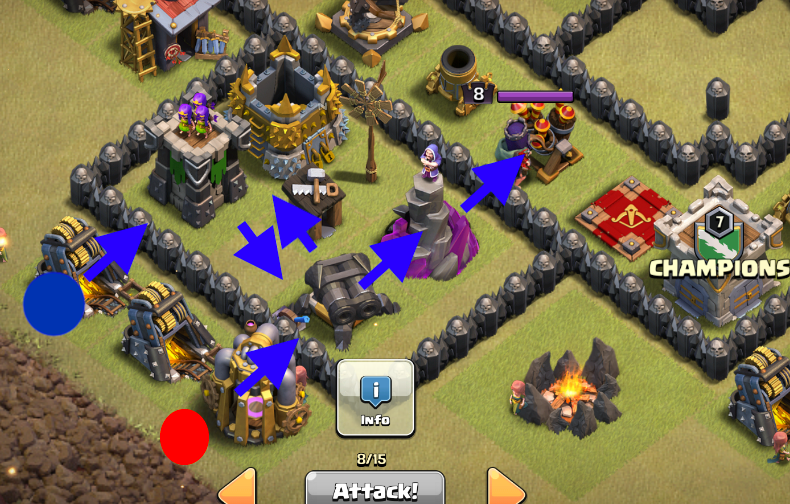
An example of the mechanics of hog pathing.
If hogs were placed at the red dot, they'd go to the double cannon and split to the archer tower and wizard tower. This split would not be good, as the hogs would go to a different direction. Instead, deploying the hogs at the blue dot would allow the hogs to path naturally. (I'm aware this is a contrived example, as the hogs attacking the archer tower would go back to the wiz tower then the air def, but you get the point) |
|
|
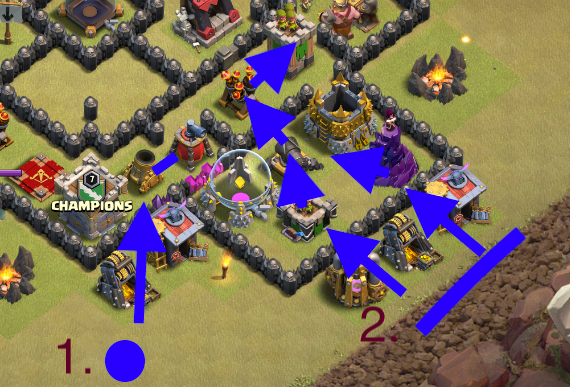
Generally, hogs should path in the shape of the arc. This allows them to stay close together to maximize heal spells. An example of hogs following an arc (yellow) is shown below. This is why a kill squad + hogs are extremely effective, as it clears out the center (red), creating a natural arc pathing for the hogs.
|

|
Hog Deployment
The typical hog deployment strategy is just to hold a finger down and for all the hogs to deploy in one spot. This is not necessarily a bad strategy. Especially when hog pathing works out, it's fine as long as you're sure it won't destroy all the hogs with giant bombs.
Another common deployment strategy is to deploy them in the same general area - deploy them in a short line tangent to the base. This could help or worsen hog pathing, but you'll have to decide what to use after examining which would allow more effective hog pathing.
A more advanced, but effective, strategy to learn that can be used in combination of the others is surgical deployment. This means deploying a small group of 3-4 hogs to take out specific defenses to improve hog pathing. For example:
|
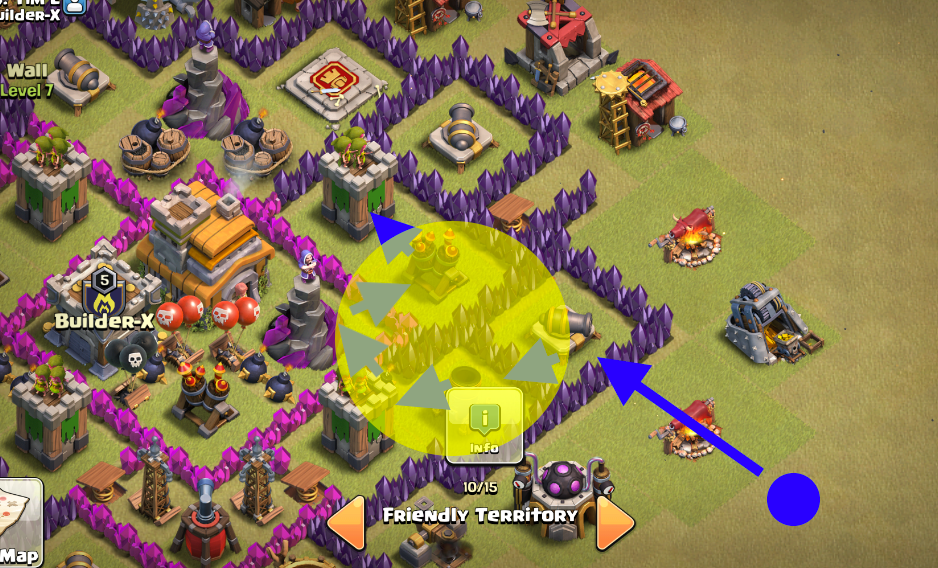
Let's say you wanted the hogs to path to the archer tower at the top of the image and continue upwards. If you deployed the hogs only at step two, the hogs may branch off into the mortar and continue in the reverse direction. That's not good.
Instead, you could use surgical deployment and bring, let's say, 3-4 hogs deployed at step 1, and about a second later, deploy the rest at step two, so they meet at the air defense and continue upward. This seems like a much better solution! You can use as much or as little of surgical deployment as you want, depending on your preference. |
|
Heal Placement
The most common mistake for placing heals is right on top of hogs. This is bad in two ways: 1) Hogs are already halfway through the heal spell and will only be under it for around half of the time. 2) There might be not many defenses near the hogs, and so the hogs scurry past the heal spells in an instant.
The key concept is: heal defenses, not hogs. What does this mean? Hogs will always stop where there are defenses, so it is most effective when a heal spell covers multiple defenses. Also, keep in mind that hogs are not at the center of each defense, and approach it from one side, so keep this in mind when deciding exactly where to place them.
The key concept is: heal defenses, not hogs. What does this mean? Hogs will always stop where there are defenses, so it is most effective when a heal spell covers multiple defenses. Also, keep in mind that hogs are not at the center of each defense, and approach it from one side, so keep this in mind when deciding exactly where to place them.
|
Using your newfound knowledge of hog pathing, use this to your advantage when determining where to place your heals. For example, as the hogs approach the mortar, this is a good place to put a heal.
Note 1: The heal spell goes slightly below the mortar because the hogs will be attacking the mortar slightly below it Note 2: This example is not representative of good/bad hog pathing, and is just used as an example of where the heal spell would be placed if the hogs were deployed at that spot |
|
There are a two things to keep in mind. Overlapping heal spells are (usually) bad as the intersection of the heal spells are wasted. Second, beware of wizard towers and possible giant bombs. These deal big damage to the entire group of hogs there. If pathing requires the hogs to go there, be ready to place heals at those locations. Remember, it's giant bombs and wizard towers that are major threats to hogs, not point defenses (archer towers and cannons).
